Arterial Cannulation
◆ The
target area should be digitally palpated. The cannula should be inserted so
that its flow direction and jet are away from the arch vessels (Fig. 2.4).
◆ Two
sets of purse-string sutures (braided nonabsorbable 2-0) are placed around the
target (8 to 10 mm diameter), with the free ends controlled with tourniquets on
each side.
◆ There
are several options for the actual cannulation, using a no. 15 or no. 11 blade.
Some surgeons prefer to incise transmurally and control the opening with their
finger, passing the tip of the cannula under the digit into the aortic opening
(Fig. 2.5). Some cut in an oblique manner but control the resulting flap with
the forceps, directing the cannula under control into the opening. Another
elegant method involves incising only the adventitia and media, leaving the
paper-thin intima to be punctured by the cannula (Fig. 2.6).
◆ The
safest skin incision for femoral cannulation is a vertical incision overlying
and just slightly medial to the femoral pulse (Fig. 2.7). An alternative
incision is a slightly oblique incision aligned with the inguinal ligament to
facilitate healing.
◆ Lymphatic
vessels should be carefully cauterized or ligated to prevent the formation of a
lymphocele and persistent drainage.
◆ Proximal
and distal control of the femoral artery should be obtained. A target site for
the arteriotomy should be chosen after considering where the proximal clamp may
be safely placed and how the repair will be accomplished when the cannula is
removed (Fig. 2.8, A). The distal vessels may be occluded with separate clamps
or tapes (see Fig. 2.8, B).
◆ The
arteriotomy should be made in a transverse fashion and the femoral cannula
gently introduced while an assistant releases the proximal clamp. The cannula
is then secured by tying it to the proximal snare, with a second suture
securing the tubing to the surface of the thigh.
◆ A
5- to 8-cm transverse incision is made about 2 cm below the clavicle, overlying
the delto- pectoral groove (Fig. 2.9). The dissection is continued between the
fibers of the pectoralis major. There is often soft fat in this space, and the
area should be dissected gently to avoid tearing of vessels and blood staining.
The exposure is further aided by two self-retaining retractors. In an
emergency, it is often necessary to sacrifice small nerves to the pectoralis
major.
◆ The
cephalic vein is identified in this space, where it penetrates the fascia to
join the axillary vein. The clavipectoral fascia is incised, and the pectoralis
minor muscle is retracted laterally or partially dissected. The axillary vein
should be encircled with loops and gently retracted cephalad.
◆ The
artery, which lies superior and deep to the vein, can be identified by
palpation and then exposed and controlled proximally and distally with tapes.
Arterial branches of the thoracoacromial trunk may be encountered and should
be controlled with silk snares. Care must be taken to avoid touching the medial
and lateral brachial plexus cords.
◆ After
heparin is administered, the artery can be controlled with clamps, but we
prefer to use a partial occluding clamp at the arteriotomy site. An 8-mm tube
graft should be anastomosed to this site (Fig. 2.10) and the arterial cannula
inserted into the tube graft. The cannula is not advanced into the axillary
artery proper, but rather perfuses from within the graft.5
◆ At
the end of the procedure, the stump can be controlled with several very large
hemoclips applied transversely and then oversewn with 4-0 polypropylene
sutures.
◆ This
technique is extremely useful in situations of severe atherosclerotic disease
of the aorta (porcelain aorta) or for a type A dissection in an emergency (Fig.
2.11).
◆ Venous
(right atrial) cannulation should be obtained first to allow for the rapid
institution of bypass after cannulating the apex. Similarly, if possible, the
right superior pulmonary vein should be cannulated first for venting because it
is difficult to mobilize the heart after the cannula is in place for fear of
left ventricular tearing. An easy alternative is to vent the pulmonary artery.
◆ Manipulation
of the apex may cause instability, so the equipment should be ready before
proceeding.
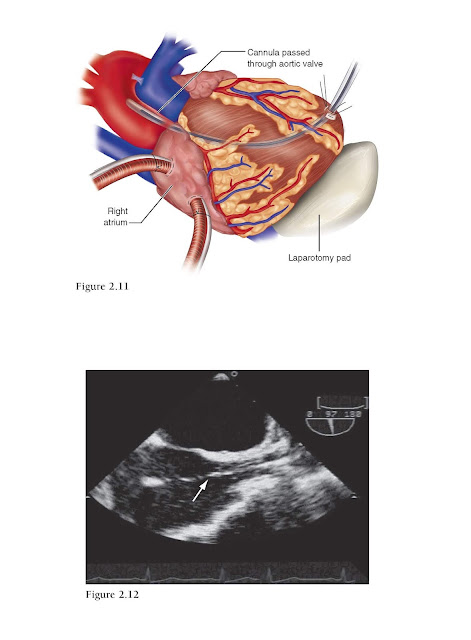
◆ A
14 F needle is inserted in the apex, and a guidewire is passed across the
aortic valve with transesophageal echocardiography (TEE) guidance. A laparotomy
pad is placed under the left ventricular apex to stabilize the heart.
◆ There
is no need to predilate the opening. A wire-reinforced cannula with an inner
dilator is passed over the guidewire and positioned across the aortic valve.
The cannula is then connected to the circuit and de-aired, and bypass is
commenced. Its position can be verified by TEE (Fig. 2.12).
◆ It
is not recommended to place purse-string sutures in the epicardium until after
bypass has started because beating of the heart may cause tearing. Once the
heart is on bypass, however, with the heart decompressed, we place two large,
braided, pledgeted purse strings, controlled with a tourniquet. The cannula is
tied to these tourniquets and is also fixed to the skin to prevent motion.
◆ The
strategy to deal with the relevant aortic pathology (e.g., dissection) should
include provision of an alternative cannulation site (e.g., side graft to
ascending aortic tube graft) to allow the apical cannula to be removed and the
purse strings tied while the heart is flaccid. We further buttress this repair
with biologic glue.
Keywords : Cannulation Techniques for Cardiopulmonary Bypass, cannulation techniques, cardiopulmonary bypass, Surgical Anatomy, Operative Steps, Arterial Canulation, Venous Cannulation, Postoperative Care, Pearls and Pitfalls, Ascending Aorta, Femoral and Iliac Vessels, Axillary Artery


